






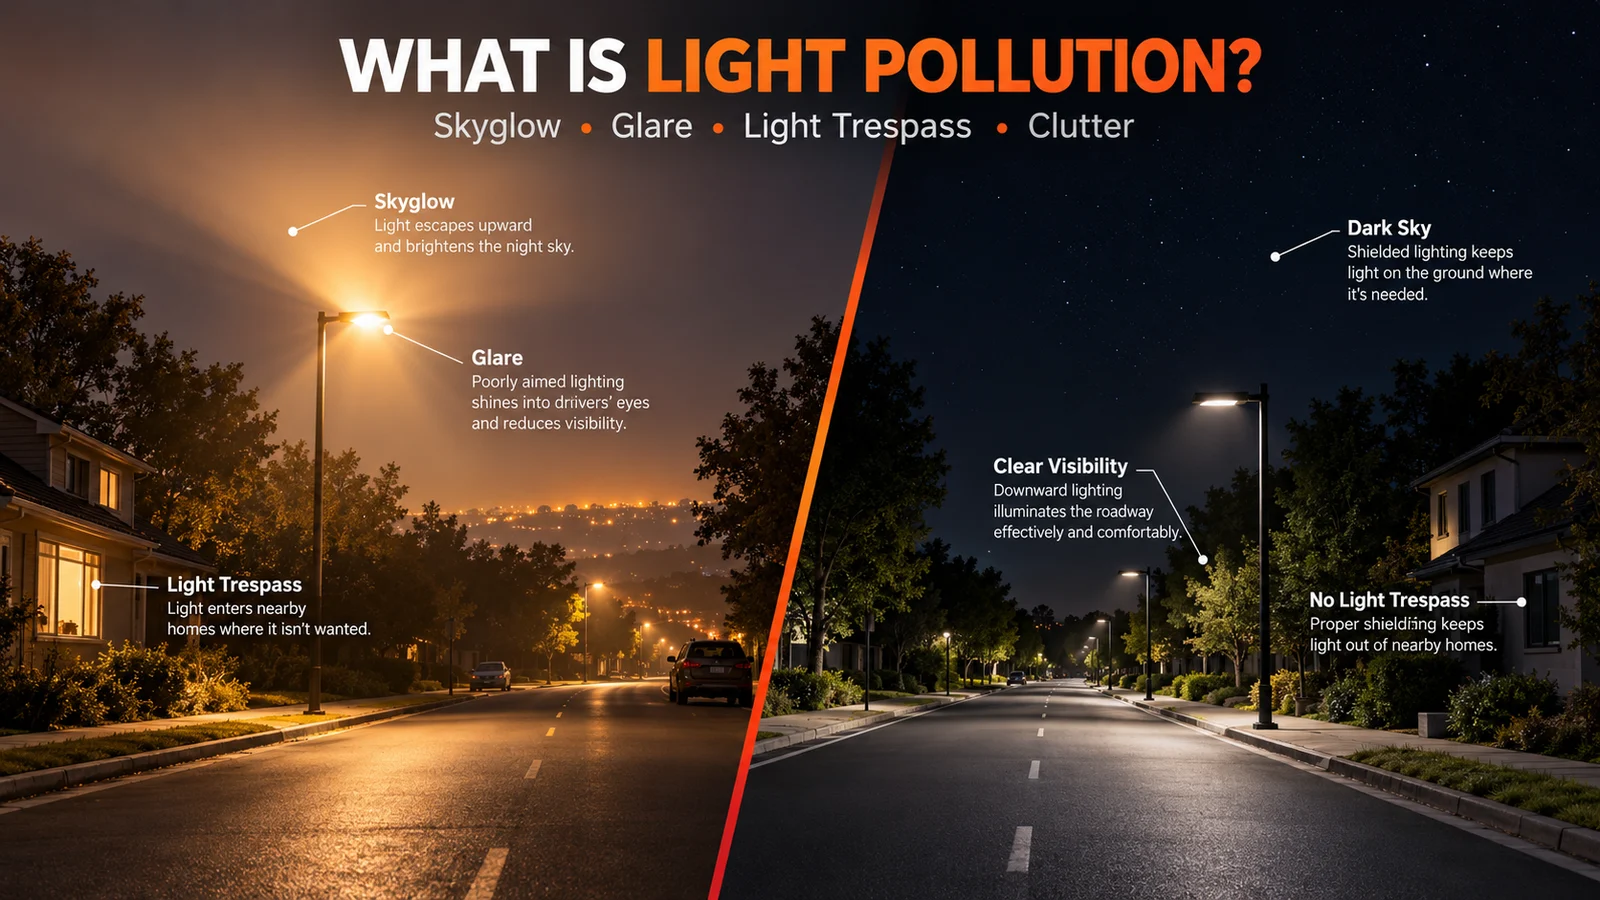
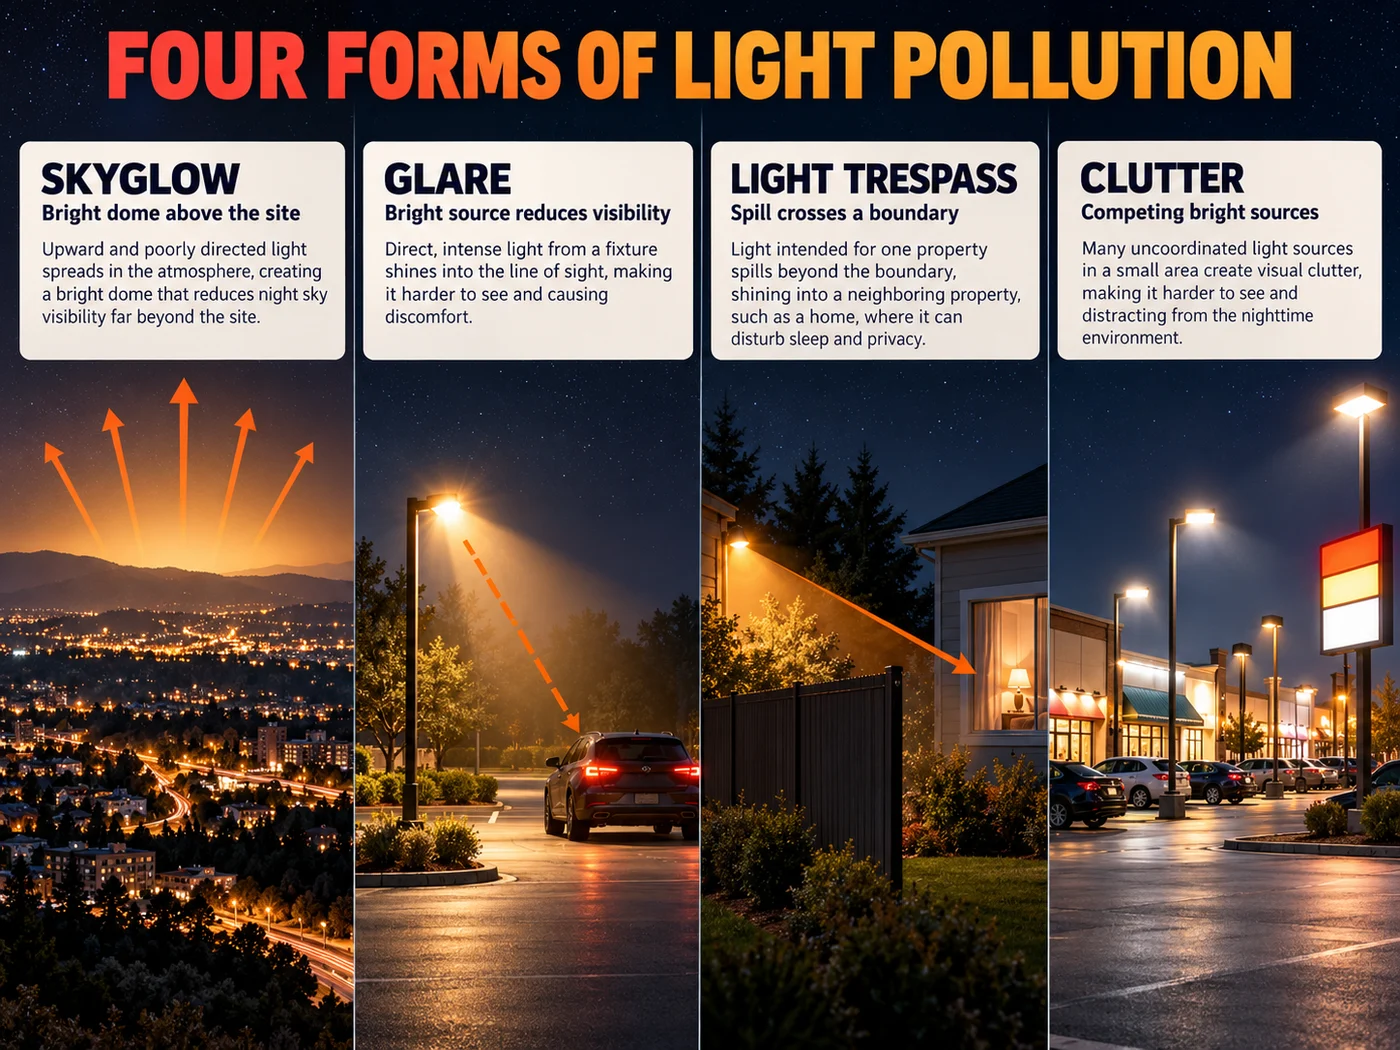
What is light pollution? It is artificial light used in the wrong place, at the wrong time, in the wrong direction, or at a higher level than the task needs. It appears as skyglow above towns, glare that makes seeing harder, light trespass across a property boundary, and clutter from too many bright sources competing in one view.
Light pollution does not mean that roads, paths, loading areas, campuses, or public spaces should be left dark. The practical goal is better lighting: put enough light on the task, keep it out of the sky and neighboring spaces, reduce it when activity falls, and choose the spectrum with care.
إجابة سريعة: The most effective fixes are to remove unnecessary light, aim and shield the remaining light, avoid over-lighting, use schedules or adaptive controls, and select warmer light where the visual task allows. A brighter fixture is not automatically a safer one.
What is light pollution in plain language?
The U.S. National Park Service defines light pollution as excess or inappropriate artificial outdoor light and separates it into glare, light trespass, and skyglow. For a lighting designer or project buyer, that definition becomes a simple test: does every lumen serve a defined task during the hours when that task exists?
If a road luminaire lights the carriageway and pedestrian conflict points with controlled glare, it is doing useful work. If the same installation sends light above the horizon, through bedroom windows, into a habitat, or across an empty site at full output after activity has stopped, that portion is pollution.
The important distinction is between light and lighting. Light is the output. Lighting is a designed system of luminaires, poles, optics, mounting positions, controls, surfaces, and operating hours. Light pollution is usually a system problem, so changing only the wattage or color temperature rarely solves every part of it.
The four forms you can identify on a real site
| Form | What a person sees | Common project cause | First design response |
|---|---|---|---|
| Skyglow | A bright dome over a town or site; fewer visible stars | Direct uplight plus light reflected from surfaces and scattered in the atmosphere | Eliminate direct uplight, reduce excess output, review aiming and reflected light |
| Glare | A bright source that causes discomfort or reduces visibility | Exposed LEDs, high luminance in the field of view, poor aiming, excessive contrast | Shield the source, improve optics and mounting, reduce output, check observer positions |
| Light trespass | Light crossing into a home, adjacent property, habitat, or other unwanted area | Spill beyond the target, backlight, wrong pole position, poor boundary control | Set boundary criteria, use shields or suitable optics, relocate or re-aim the luminaire |
| Clutter | Many bright signs or luminaires competing visually | Uncoordinated fixtures, inconsistent brightness, decorative layers added without a site plan | Establish a hierarchy, remove redundant sources, coordinate output and controls |
These effects can overlap. Once the question what is light pollution is applied to a real site, a single badly aimed floodlight may create direct glare for a driver, spill into a nearby residence, and add to skyglow at the same time. That is why a night inspection should look from several viewpoints rather than judging the installation only from beneath the pole.
What causes light pollution?
When a project team asks what is light pollution caused by, the visible symptom may be a bright sky, but the cause is often one of six design or operating decisions.
Light sent above or near the horizon
Unshielded fixtures and upward-aimed luminaires release light directly into the atmosphere. The National Park Service notes that outdoor light emitted upward or sideways is a primary source of skyglow. Even a nominally downward-facing luminaire can contribute if it is tilted after installation or if its optic sends a strong high-angle beam beyond the task area.
More light than the task requires
Over-lighting often begins with a catalogue shortcut: selecting the highest wattage as a safety margin. The result can be excessive luminance, harsh contrast, wasted energy, and complaints at the boundary. The correct margin belongs in a documented lighting calculation that includes maintenance and operating conditions—not in an unexamined jump to a larger fixture.
Poor pole, optic, and aiming choices
Pole height, setback, arm length, tilt, beam distribution, and spacing work together. A suitable roadway optic at the wrong mounting geometry can perform badly; a precisely aimed floodlight can be useful while the same unit pointed too high becomes a source of glare and spill. Review an IES Type III distribution guide alongside the full layout rather than choosing an optic name in isolation.
Bright surfaces and atmospheric scattering
Light reflected from pale pavement, façades, snow, or other surfaces can still enter the sky. Dust, haze, moisture, and clouds change how that light is scattered. This is why two sites with the same luminaire schedule can look very different at night, and why a clear-night commissioning visit does not answer every weather condition.
Blue-rich light used without a task-based reason
Shorter wavelengths scatter more readily in the atmosphere and can have greater ecological consequences in some settings. That does not make one correlated color temperature universally correct. A site still needs to balance visual performance, object recognition, camera requirements, local rules, habitat sensitivity, and community expectations. The soft white versus daylight guide explains the practical CCT trade-off without treating color temperature as a quality score.
Full output when nobody needs it
A well-aimed luminaire can still waste light if it remains at 100% through empty hours. Photocells, timers, astronomical schedules, motion sensors, and networked controls each solve a different timing problem. The dusk-to-dawn control guide shows why switching on at sunset is only the first control decision.
Why is light pollution bad?
A useful answer to what is light pollution and why does it matter is broader than losing a view of the stars. Light pollution can reduce visual comfort, waste energy, disturb neighboring properties, alter nighttime habitats, and make an otherwise competent lighting project harder to operate and defend.
It can make seeing harder
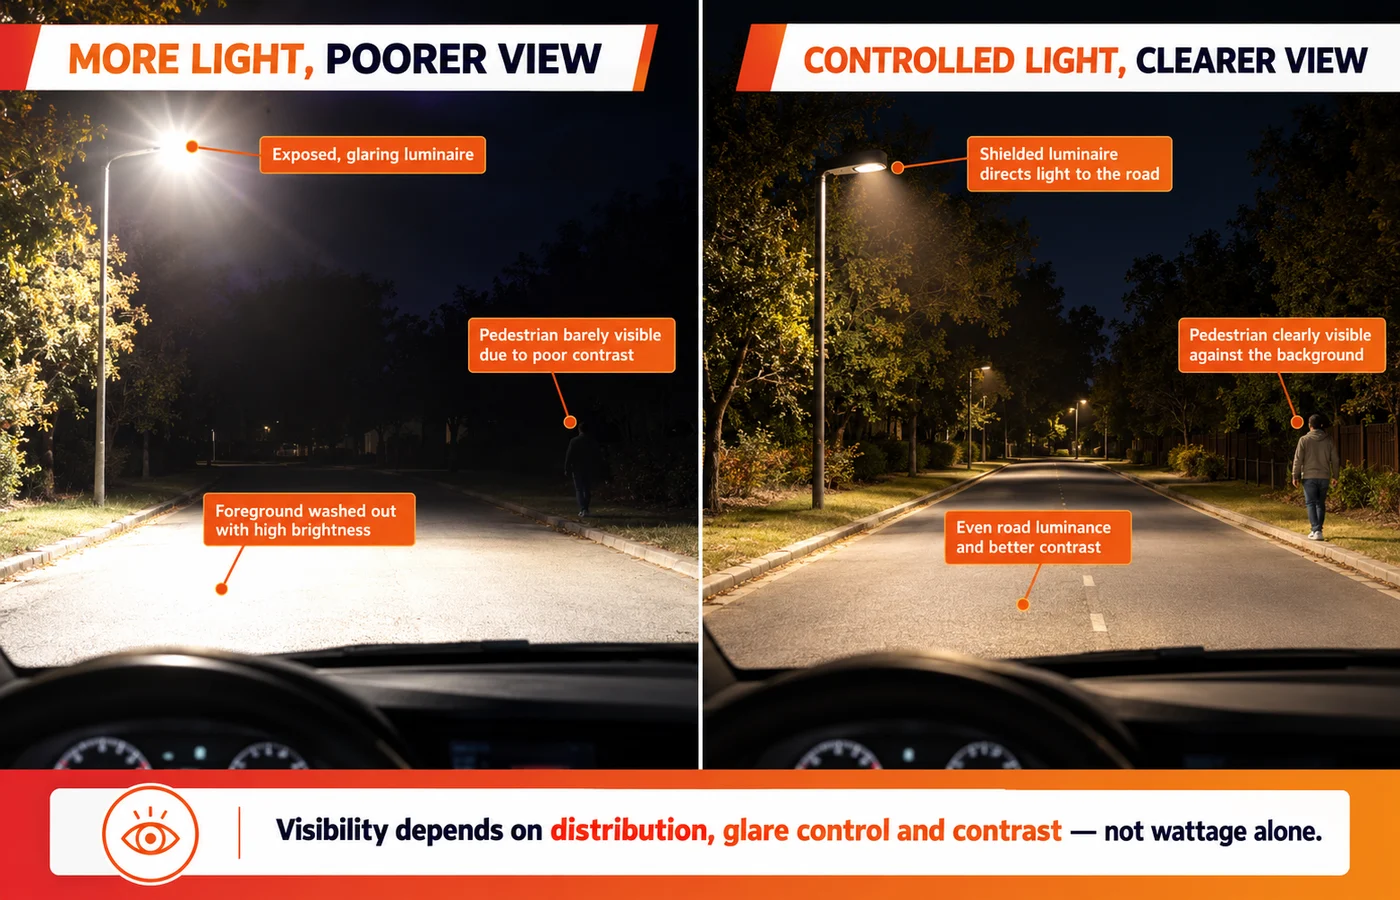
Glare is not the same as useful visibility. A bright source near the line of sight can veil detail and force the eye to adapt to the source instead of the road, person, obstacle, or task. Uniformity and controlled contrast often matter more than a dramatic bright patch directly beneath a luminaire.
It wastes energy and available solar storage
Light outside the task area still consumes power. On a grid-connected system, that raises operating cost. On a solar lighting system, it also spends a limited nightly energy budget. Better optics and dimming can preserve energy for the hours and locations that matter, but they must be designed from project inputs rather than assumed percentages.
It crosses social and property boundaries
Light trespass can turn a technically working installation into an ongoing complaint. A boundary, bedroom window, guard post, roadway approach, or control-tower sightline may require a different vertical-light check. Resolving those viewpoints before procurement is easier than adding improvised shields after poles are installed.
It affects nocturnal environments
Artificial light at night can change the behavior of insects, birds, bats, and other wildlife. The response depends on species, spectrum, intensity, timing, and habitat. The solution is not a marketing label such as “eco light”; it is a site-specific plan that limits unnecessary exposure. The companion guide on whether LED lights attract bugs explains why spectrum, brightness, placement, and duration must be considered together.
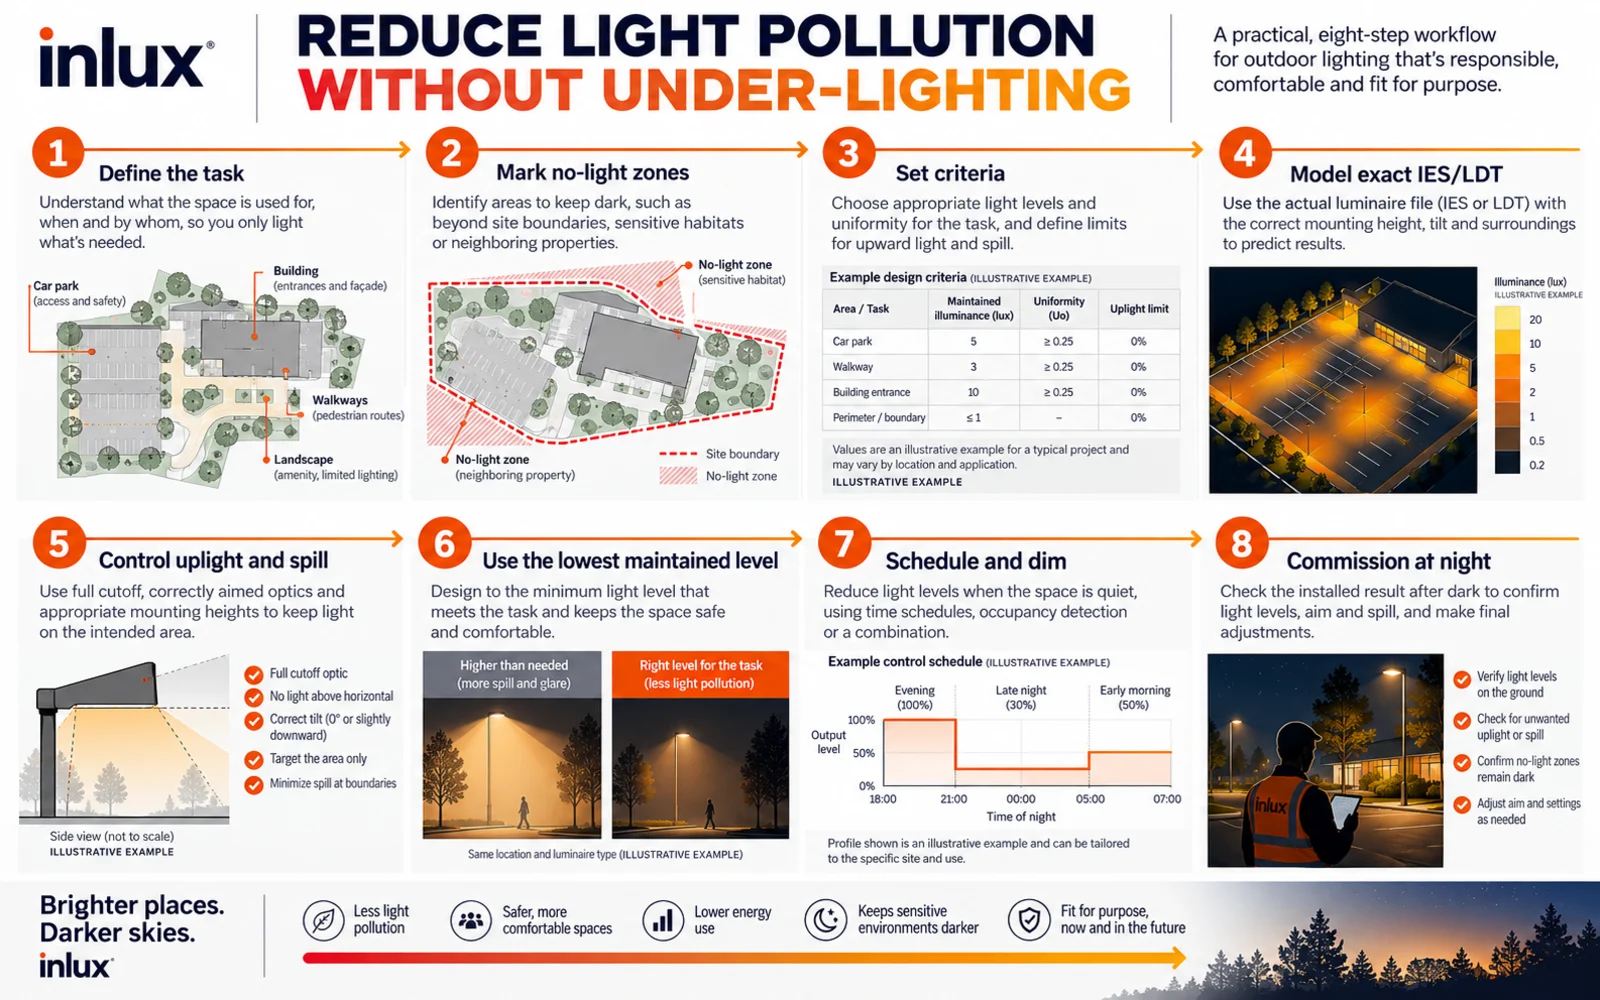
How to reduce light pollution without under-lighting the site
After defining what is light pollution, the next job is to remove the unwanted light without compromising the actual task. The joint DarkSky–Illuminating Engineering Society principles describe responsible outdoor lighting as useful, targeted, low level, controlled, and warm-colored where possible. Those principles are a strong starting point, but a procurement team still needs a workflow that can be checked in drawings, photometric files, controls, and commissioning records.
1. Define the task and the no-light zones
List what people must see, where they must see it, and during which hours. Then mark residences, habitats, property lines, road approaches, control rooms, and other sensitive viewpoints. “Light the area” is too vague to control spill.
2. Set project criteria before choosing wattage
Use the applicable local standard or authority requirement for the task. Record maintained illuminance or luminance, uniformity, glare criteria, vertical requirements, and boundary limits where applicable. Do not copy a target from an unrelated road class or parking layout.
3. Build a layout with model-specific photometry
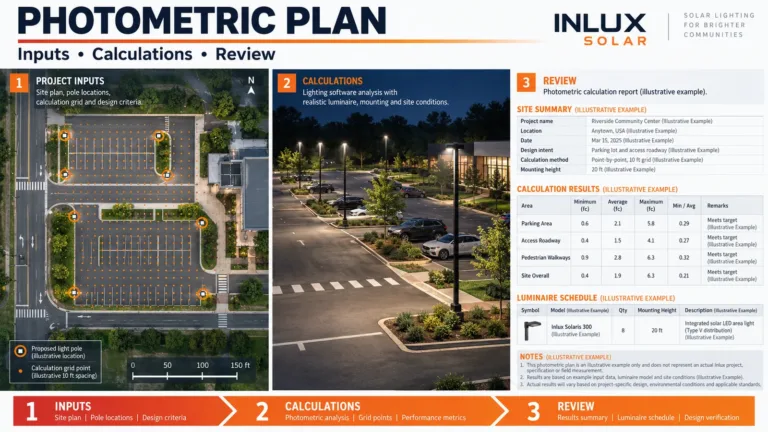
Ask for IES or LDT files for the exact luminaire and optic. Model pole positions, mounting heights, tilts, surfaces, and obstructions. A product rendering cannot prove where light lands. The parking-lot lighting design guide gives a practical example of why average illuminance alone is not enough.
4. Control uplight, backlight, and high-angle light
Prefer optical distributions and mounting arrangements that put light inside the task area. Check backlight at boundaries and high-angle light near observer positions. Shields can help, but a shield that blocks useful light may require a new calculation; it is not a substitute for the right optic and pole geometry.
5. Use the lowest maintained level that satisfies the task
“Low level” does not mean guessing low. It means meeting the selected criteria without avoidable excess. Include the maintenance factor and expected operating condition so the installation is not dramatically over-lit when new simply to compensate for an undefined future loss.
6. Reduce output when activity falls
Create a schedule for normal activity, low activity, curfew, and exceptional events. For solar systems, coordinate the dimming profile with worst-month energy availability and battery autonomy. For grid LED systems, verify that the driver and control interface implement the schedule reliably.
7. Choose spectrum for the site
Use warmer light where it satisfies the visual task and site constraints, particularly near sensitive habitats or residential edges. Where a different spectrum is required, document why and offset its impact through tighter distribution, lower output, and shorter operating time.
8. Commission the installation at night
Verify tilt, aiming, control schedules, failed or overridden sensors, boundary spill, and glare from the viewpoints that matter. Keep a photographic and settings record. A design file is only a prediction; commissioning confirms what was actually installed.
A worked example: a road beside homes and open land
Consider a hypothetical two-lane access road. Asking what is light pollution on this road changes the review from an abstract environmental discussion into a layout problem. Homes sit along one side, while open land and a drainage corridor sit on the other. The first proposal uses identical luminaires on both sides, all at full output from dusk to dawn.
The better review starts by separating tasks and risks:
| Question | Design response |
|---|---|
| Where is light needed? | Carriageway, junction conflict points, pedestrian crossings, and entrances |
| Where is it unwanted? | Bedroom-facing boundaries, open land, drainage habitat, and above the horizon |
| What changes after peak activity? | Lower traffic allows a reduced-output profile, subject to local requirements |
| What must the simulation show? | Maintained road criteria, uniformity, observer glare criteria, and selected boundary checks |
| What must commissioning confirm? | Actual tilt, schedules, sensor behavior, spill at homes, and views along the road |
The project may use different backlight control or mounting setbacks along the residential edge, a tailored distribution near the drainage corridor, and a staged dimming profile after peak hours. The point is not that one product setting fits every site. The point is that each lumen has a named job and an operating time.
Inlux Solar has delivered more than 300,000 units across 60+ countries. That geographic range is precisely why we do not treat one CCT, pole spacing, or dimming schedule as universal. Climate, road classification, community use, wildlife context, authority rules, and worst-month solar resource all change the answer.
What current official guidance agrees on
The details vary by jurisdiction, but the major guidance sources converge on a practical direction. The National Park Service identifies glare, light trespass, and skyglow as key forms of light pollution. Its published synthesis also reports that continuously lit areas brightened by about 2.2% per year from 2012 to 2016, while citizen observations suggested average night-sky brightness increased by 9.6% per year from 2011 to 2022. Those are global research observations, not a forecast for a particular project.
إن U.S. Department of Energy summary of ANSI/IES TM-37-21 lists 5 broad actions: eliminate unnecessary lighting, eliminate uplight, reduce lumen output, control spectral content, and set appropriate expectations. The International Commission on Illumination position statement CIE PS 003:2025 likewise emphasizes restricting unwanted light by place, time, and level rather than treating all outdoor illumination as unacceptable.
These sources do not provide one universal wattage, CCT, curfew, or boundary value for every road and site. The applicable authority and lighting standard must supply the project criteria. The shared message is still operationally useful: first prove that the light is needed, then control its direction, amount, spectrum, and operating period.
The 15-field verification record
A night audit becomes much easier to compare with the approved design when every observation uses the same record. Capture these 15 fields for each sampled location; they are record categories, not universal pass/fail limits.
- Location ID: pole, luminaire, cabinet, or zone identifier.
- Date and time: including the control stage expected at that time.
- Weather: clear, cloudy, hazy, dusty, wet, or dry conditions.
- Observer position: driver, pedestrian, resident, guard, or operator viewpoint.
- Luminaire model: exact delivered model and optic code.
- Mounting geometry: measured pole height, outreach, setback, and tilt.
- Control state: on, off, dimmed, scheduled, sensor-triggered, or manually overridden.
- Output setting: programmed percentage or driver setting, if available.
- Horizontal illuminance: measured in lux at the approved grid points where required.
- Vertical illuminance: measured at the named boundary or recognition plane where required.
- Road luminance: recorded where the governing road-lighting method uses luminance.
- Glare criterion: the required metric and calculated or measured result under the applicable method.
- Boundary condition: spill source, receptor, direction, and agreed limit.
- Physical condition: tilt, shield, lens, dirt, vegetation, damage, and obstruction.
- Corrective owner: design, supply, installation, controls, maintenance, or another identified party.
Keep units, instrument details, calibration status, grid positions, photographs, and the approved revision with the record. A phone photograph alone can document visible aiming or spill, but it cannot replace a contractual photometric measurement.
A tender-ready light pollution checklist
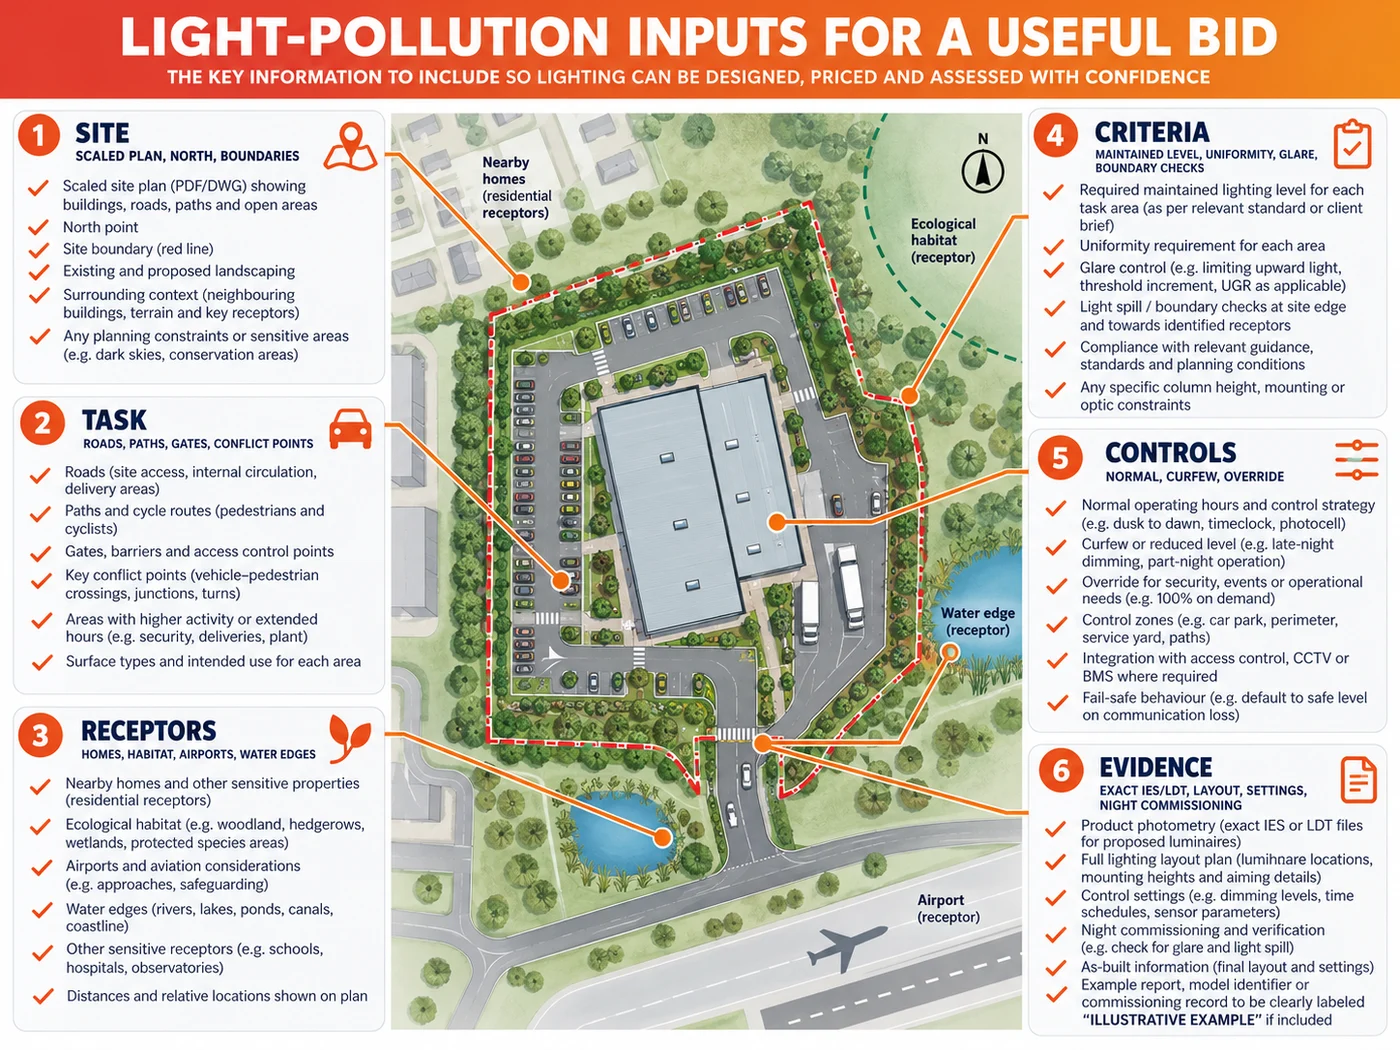
For a buyer, what is light pollution becomes a set of requirements that can be requested and verified. Use this block when requesting a road, parking, industrial, campus, perimeter, or solar lighting proposal:
Provide a model-specific photometric layout using the quoted luminaire, optic, mounting height, arm, tilt, pole position, surface assumptions, and maintenance factor. Report the applicable task criteria, uniformity, glare measure, direct uplight, and agreed vertical or boundary-light checks. Identify sensitive receptors and no-light zones. State the CCT and spectral option, normal and curfew output levels, control schedule, override behavior, and commissioning method. Supply the IES/LDT file and a settings schedule for the delivered configuration.
Before sending it, attach:
- a scaled site plan and north direction;
- road, path, parking, gate, building, and property boundaries;
- mounting restrictions and pole setbacks;
- sensitive residences, habitats, airports, observatories, or water edges;
- required local standards and approval authority;
- activity hours and curfew expectations;
- worst-month solar resource and autonomy requirement for off-grid systems;
- camera or security tasks that need vertical recognition;
- surface reflectance assumptions where they materially affect the model;
- a night commissioning and acceptance plan.
For system selection, compare the commercial solar street-light range, grid-powered LED street lights, و solar parking-lot lighting by the site task. The light-pollution controls belong in the project design; they are not a separate accessory added after the product is chosen.
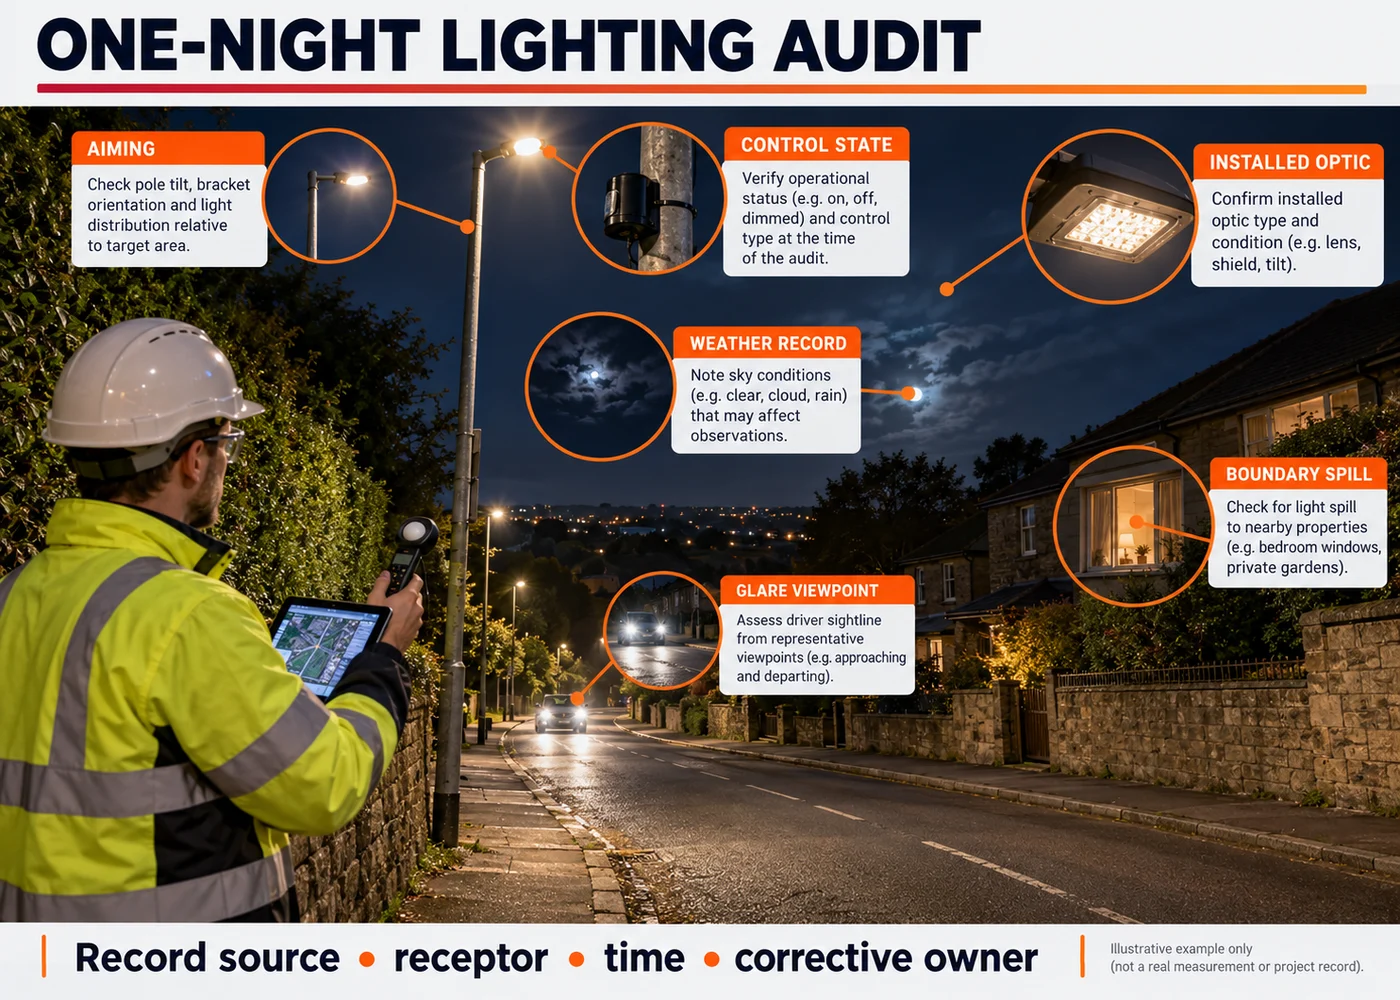
How to audit an existing installation in one night
To determine what is light pollution at an existing installation, walk the site after the normal peak period, when controls should have changed state. Bring the approved layout, luminaire schedule, control settings, a camera for records, and appropriate calibrated measurement equipment where contractual checks are required.
- Confirm which luminaires are on, off, dimmed, or overridden.
- Photograph every visibly tilted or mis-aimed luminaire from a consistent reference position.
- Look along driver, pedestrian, resident, guard, and operator sightlines for glare.
- Inspect property lines and sensitive areas for spill and bright vertical surfaces.
- Compare installed optic, mounting height, tilt, and shield with the approved schedule.
- Check whether bright signs, façades, or indoor light through windows are also contributing.
- Record weather, cloud, haze, and wet-surface conditions because they alter the appearance.
- Correct settings and aiming only through an approved change process, then recheck the task criteria.
Do not diagnose every bright sky as a street-light problem. Buildings, advertising, sports lighting, vehicle facilities, and indoor light escaping through glazing can all contribute. A useful audit assigns each observed issue to a source, a receptor, an operating period, and a corrective owner.
الأسئلة المتداولة
What is light pollution caused by?
Light pollution is caused by unnecessary or excessive artificial light, poor shielding or aiming, light sent above or beyond the task area, unsuitable pole and optic choices, bright reflected surfaces, and lighting that stays at full output when it is not needed. Weather and airborne particles can increase visible skyglow by scattering light.
What are the main types of light pollution?
The main types are skyglow, glare, light trespass, and visual clutter. One installation can create several types at once—for example, an upward-tilted floodlight can produce glare, spill across a boundary, and add to skyglow.
Why is light pollution bad for visibility?
Glare and excessive contrast can make it harder to see details even when the site has more lumens. The eye adapts to the bright source, while darker hazards become less visible. Controlled distribution and uniformity are often more useful than simply increasing wattage.
Do LED lights cause light pollution?
Any outdoor light can cause light pollution if it is excessive, badly aimed, poorly shielded, too blue-rich for the context, or left on unnecessarily. LEDs can also reduce it because their optics and controls can direct, dim, and schedule light precisely. The outcome depends on design and operation, not the technology name alone.
Can solar street lights reduce light pollution?
They can when the layout uses appropriate optics, mounting, output levels, spectrum, and controls. Solar power does not automatically make a light dark-sky responsible. A solar luminaire that is over-sized, tilted upward, or operated at full output all night can still create glare, trespass, and skyglow.
How can a city reduce light pollution without making streets unsafe?
A city can define task-based criteria, remove unnecessary sources, use full-cutoff or well-controlled optics, limit spill at boundaries, apply appropriate CCT, dim during low-activity hours, and verify the result through photometric design and night commissioning. The goal is useful visibility with less wasted light—not darkness by default.
The practical conclusion
The best answer to what is light pollution is not “too much light” alone. It is light that misses its task—in space, time, direction, level, or spectrum. That makes the solution measurable: define the task, model the exact luminaire and geometry, control spill and glare, schedule the output, and verify the installation at night.
If you are planning road, parking, industrial, campus, perimeter, or off-grid lighting, send the site plan, operating hours, sensitive boundaries, applicable criteria, and solar autonomy requirement. Ask Inlux Solar for an IES/LDT-based lighting proposal that treats useful visibility and light-pollution control as the same design problem.
Sources
- U.S. National Park Service, Light Pollution — Night Skies, accessed September 7, 2026.
- U.S. Department of Energy, Application-Specific Lighting, accessed September 7, 2026.
- DarkSky International and the Illuminating Engineering Society, Five Principles for Responsible Outdoor Lighting, accessed September 7, 2026.
- International Commission on Illumination, CIE Position Statement on Obtrusive Light and Light Pollution, accessed October 15, 2026.