






Solar lights for fence installations mount to fence faces, posts, caps or gates to define a boundary, illuminate a latch, support a nearby path or add low-level outdoor ambience without a new grid cable run. A photovoltaic panel charges a battery during the day, and the stored energy powers the LED after dark.
A fence is a convenient mounting surface, but it is not automatically a good solar or lighting position. One side may remain shaded by the fence itself. A bright fixture can spill into a neighbor’s window. A post-cap light may not fit the finished post. A motion light on a moving gate can face the wrong direction when the gate opens. Start with the boundary task and site geometry before choosing a style.
Solar Lights for Fence: The Short Answer
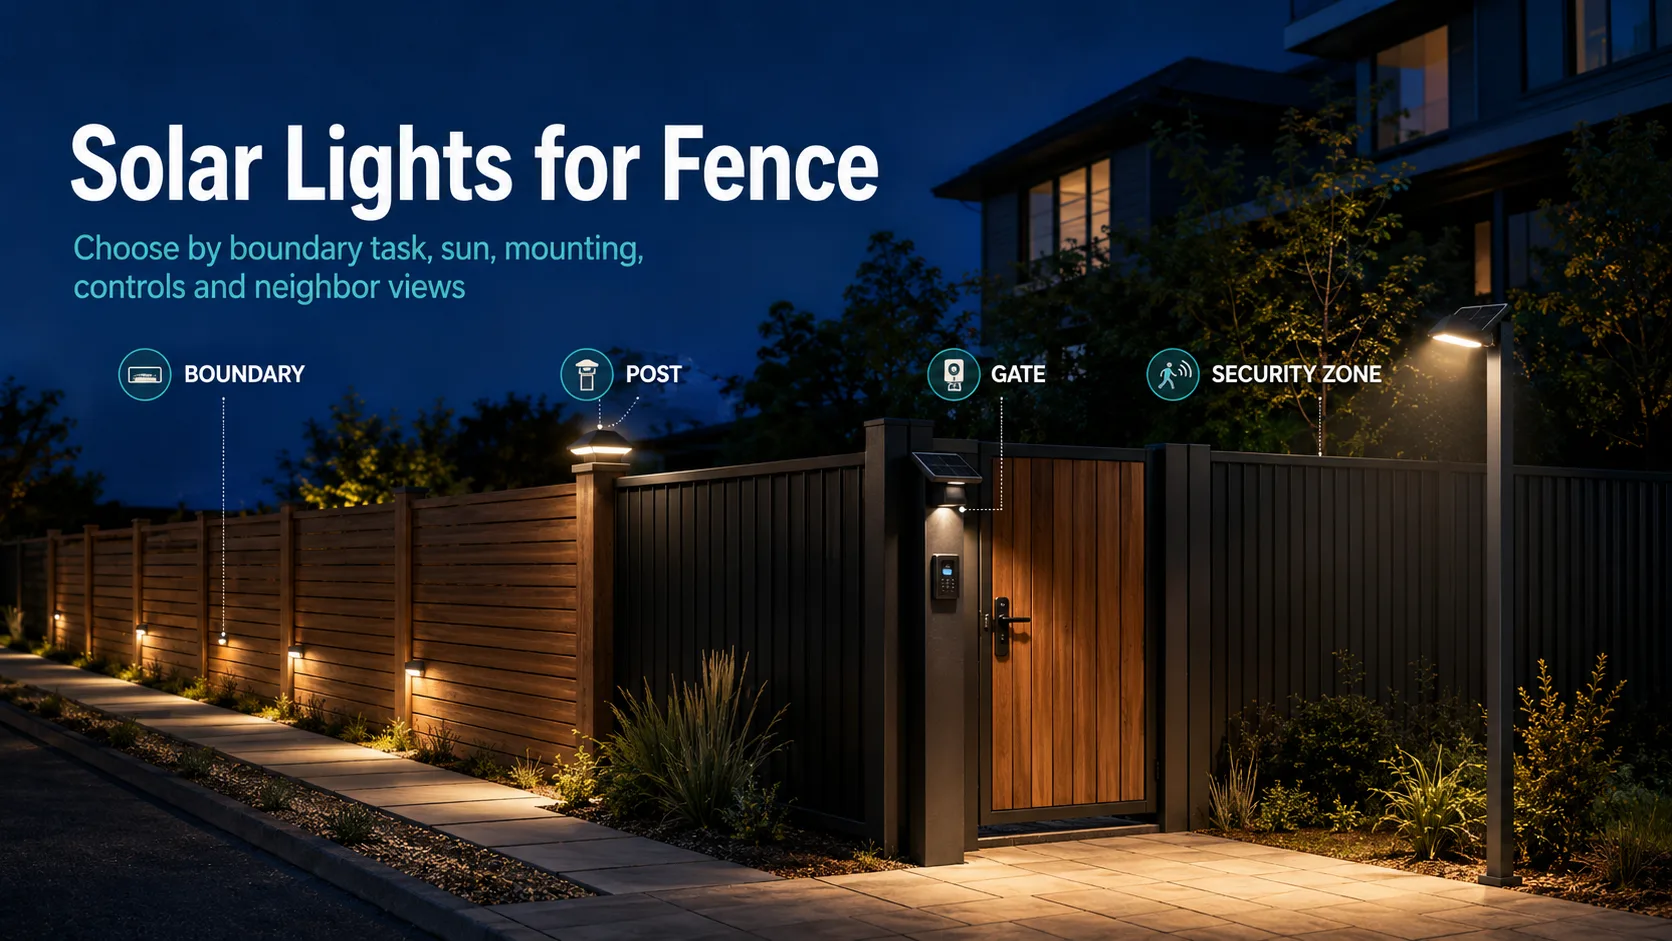
Choose solar lights for fence areas by matching the fixture to one job:
- Boundary marker: low-level face or post lights reveal the line of the fence without trying to light the whole yard.
- Post-cap rhythm: cap lights mark corners, entrances and repeated posts when the exact cap dimensions and sun exposure are known.
- Gate and latch: a controlled task light helps a person see the handle, lock, intercom or sign.
- Path beside a fence: shielded side lights can support the route, but the path still needs continuous, comfortable guidance.
- Security observation: a fence-mounted motion flood may be one component, but the wider perimeter and camera task requires a separate layout.
- Decorative layer: restrained warm light can reveal material and planting without turning the boundary into a bright line.
Check panel exposure, viewer direction, neighbors, fence material, fixing method, control sequence and maintenance access. If the fence is persistently shaded or the task needs dependable high output for long hours, consider a remote panel or wired lighting method.
Six Fence-Light Types and Their Roles
| Tipo | Typical position | Useful for | Main limitation |
|---|---|---|---|
| Face-mounted downlight | Fence board, panel or masonry face | Boundary texture, path edge and local guidance | Can glare across the property line if mounted or aimed poorly |
| Solar fence post light | Top or side of post | Corners, entrances and repeated visual rhythm | Must fit the actual post, cap, slope and adapter |
| Rail/top-mounted marker | Fence rail or narrow top surface | Low-level boundary definition | Exposed to impact, birds, debris and uneven solar access |
| Gate/latch task light | Fixed post beside a gate | Lock, handle, keypad, intercom or sign | A light on the moving leaf changes aim and solar orientation |
| Motion wall/flood light | Strong post, wall or fixed structure | Intermittent gate or perimeter task | Detection and coverage need planning; it is not a complete security system |
| Remote-panel fence light | Shaded fence with a sunnier nearby panel location | Separates charging position from lighting point | Adds cable routing, connector and panel-mounting requirements |
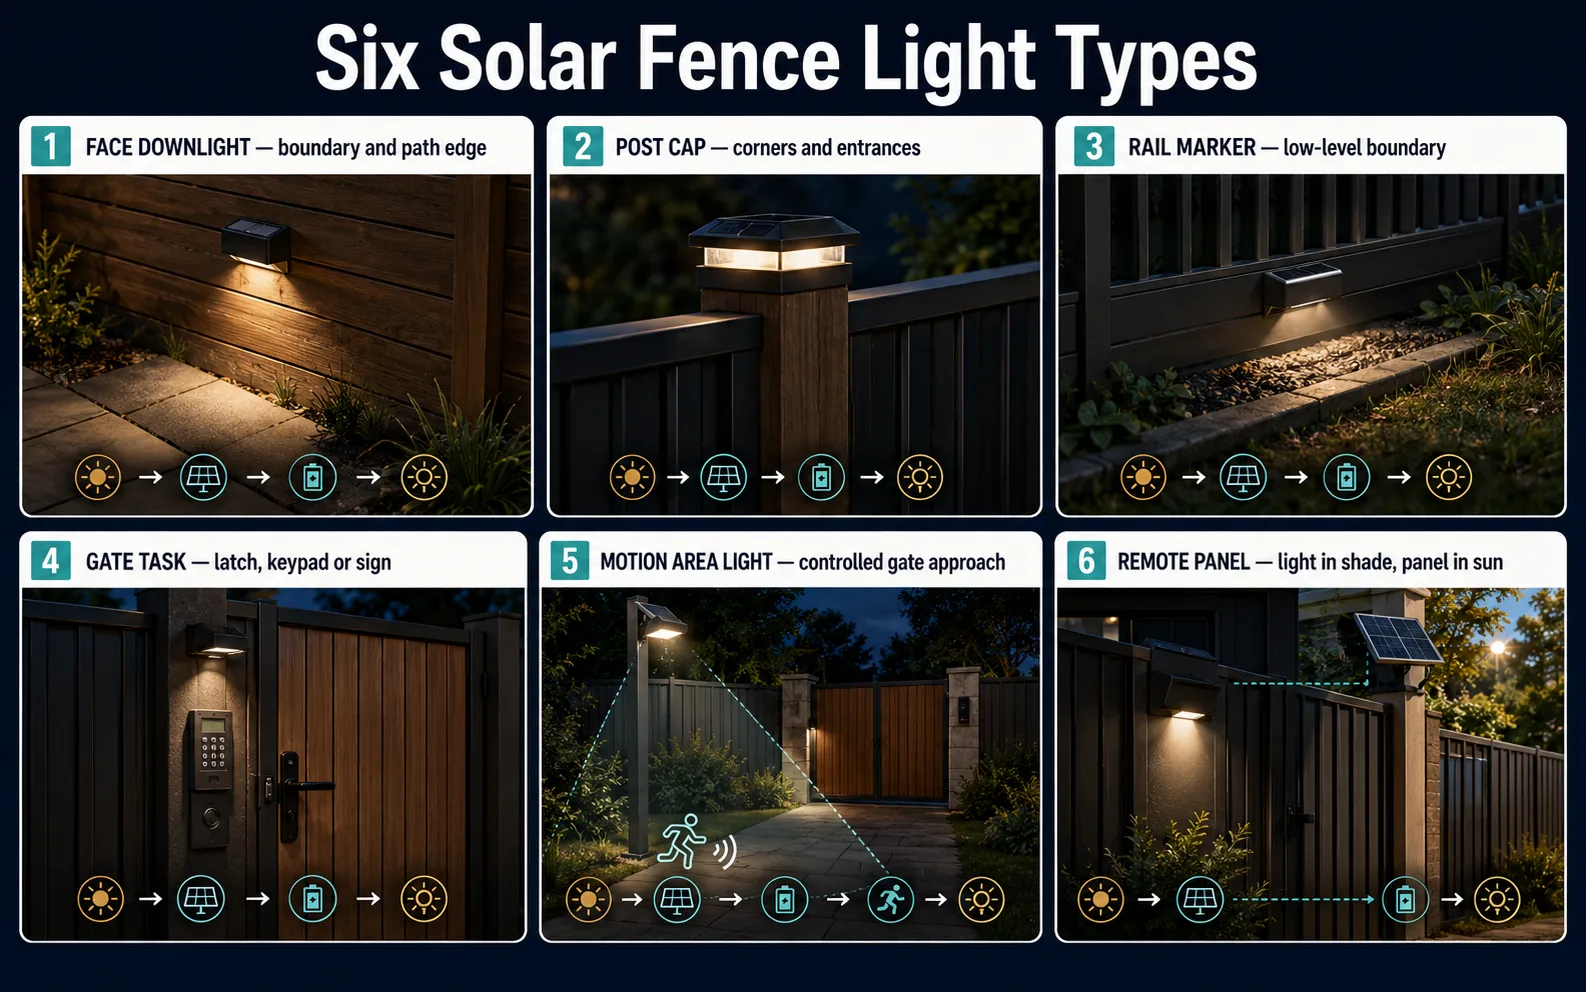
One boundary can use several types. Use fewer fixtures with clear roles rather than repeating a bright light on every post by default.
Define What the Fence Light Must Do
For solar lights for fence projects, write one sentence for the task. Examples:
- “Make the gate handle and visitor’s face visible from the house side.”
- “Mark the path edge beside the fence without lighting the neighboring garden.”
- “Show the corner posts and boundary direction after dark.”
- “Provide a low background level, then raise output when someone enters the controlled gate approach.”
- “Highlight the texture of the masonry wall during venue hours, then turn it off.”
Those statements lead to different optics, output and controls. A decorative post cap is not a substitute for gate task lighting. A motion flood used for security should not be selected from appearance alone.
Draw the fence line, gates, path, buildings and nearby windows. Mark the main viewing directions and where light must stop. Include vegetation and anything that will cast shade onto the solar panels.
Boundary Lighting Is Not Perimeter Security
Boundary lighting helps people understand an edge or local task. Security lighting may need vertical visibility, camera coordination, detection zones, background levels, glare control and a response procedure. A row of solar caps can make a fence attractive without providing useful observation of the ground, faces or activity beyond it.
For a security brief, use the perimeter and security lighting workflow. Where a fixed gate or observation zone needs broader controlled coverage, compare commercial solar flood lights and the separate solar flood lights with motion sensors guide.
Ask what must be visible, from where, for how long and by whom. If a camera is involved, check its field of view, exposure behavior and the position of bright sources. A light can be visibly bright to a person while producing poor recognition in the camera image.
Match the Mounting Method to the Fence
Fence construction changes the installation of solar lights for fence faces, caps and gates.
Timber
Confirm board thickness, post condition, treatment and the correct fastener. Avoid splitting near board edges. A horizontal board can warp or move, changing aim. New penetrations should not create a route for trapped water.
Vinyl or Composite
Thin or hollow sections may not hold a screw by themselves. Locate backing or use a mounting method approved for the system. Check thermal movement and whether a dark fixture can heat the surface in direct sun.
Metal and Aluminum
Avoid drilling without knowing the section, coating and internal space. Use compatible hardware and consider galvanic corrosion between dissimilar metals. Route cables away from sharp edges.
Chain-Link or Wire Fence
The mesh may flex and vibrate, and a simple clip can rotate. Mount the light or remote panel to a stable post or bracket where practical. Do not create snag points or sharp projections.
Masonry Boundary Wall
Use the correct anchor for the substrate and load. Check hidden services, water paths and cable entries. A remote panel may sit on the sunnier coping, roof edge or separate pole while the light remains lower.
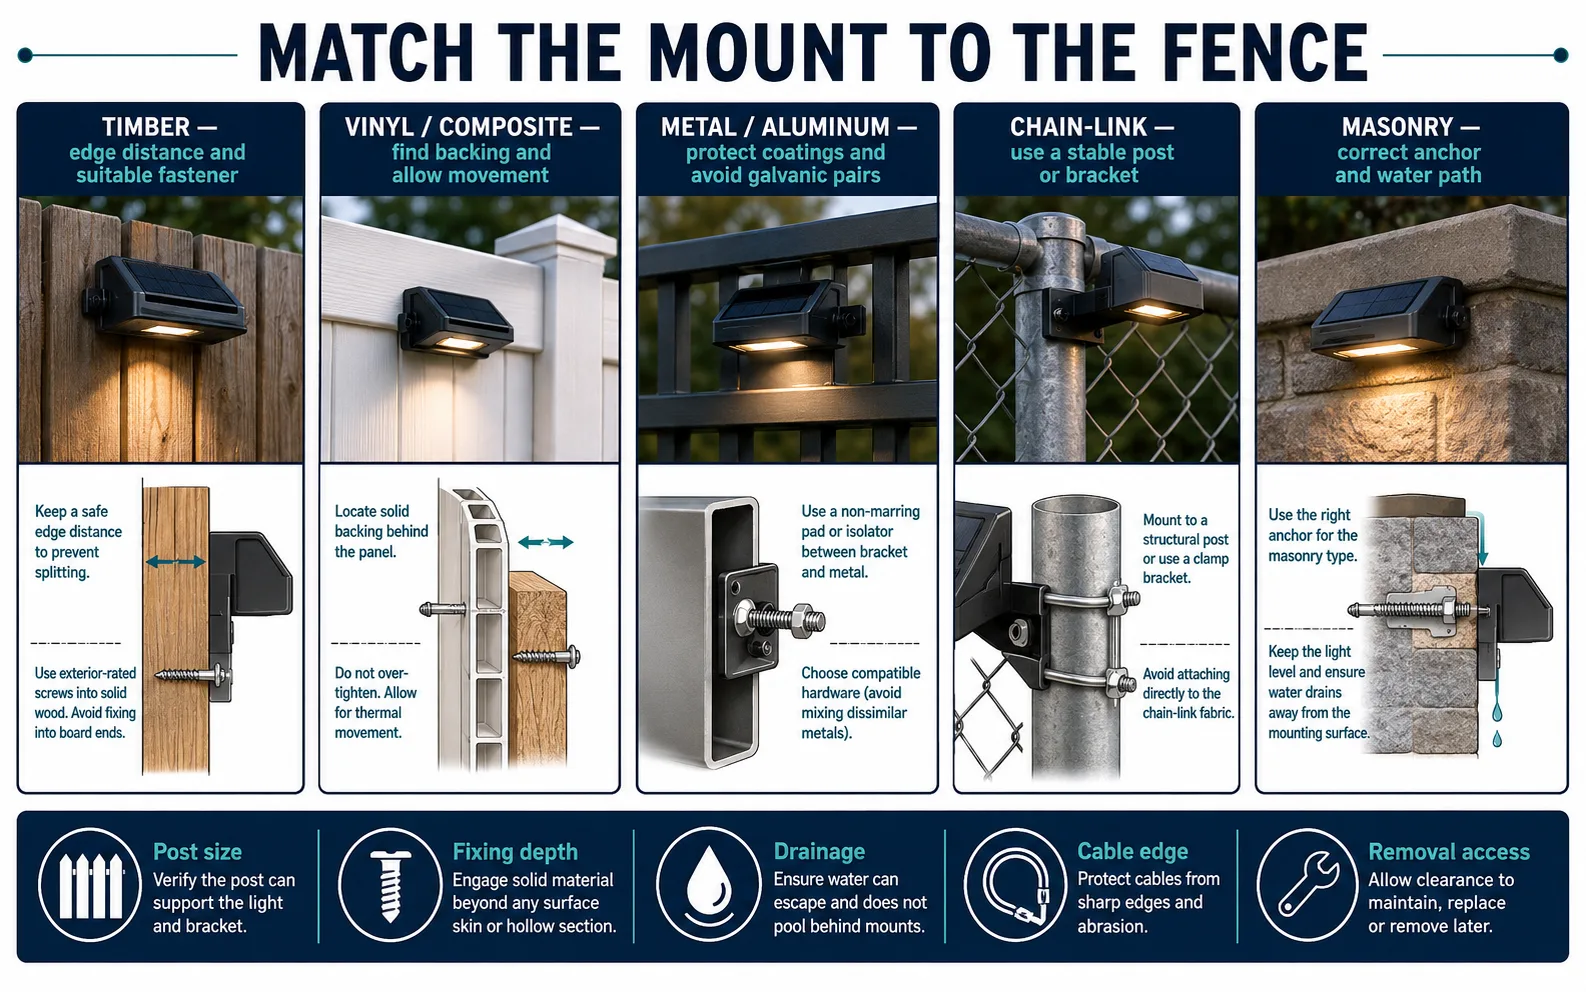
For post caps, measure the finished post rather than relying on a nominal label. Include sleeves, decorative caps and slopes. Confirm whether the product sits over the post or uses an adapter and whether the fixing permits drainage and replacement.
Check Sun on Both Sides of the Fence
A fence creates its own shade. A panel mounted on the wrong face may receive little useful sun even when the yard appears bright. Nearby buildings, trees, hedges and the fence cap add moving shadows. North/south assumptions also change by hemisphere and site.
Inspect each proposed panel location at several times of day and in the least favorable season. A long fence may not have equal charging conditions along its length. One group can perform normally while another fades early because it sits beside a tree or building.
Integrated solar lights for fence applications work where the panel and light can share one position. Choose a remote-panel architecture when the light belongs on a shaded gate, path side or lower fence face but a nearby post, roof, wall or independent bracket receives more sun.
See whether solar lights need direct sunlight e solar-light performance in cloudy weather for the charging mechanism. The final selection still needs site-specific energy and shade assumptions.
Space Lights by Task, Not Fence-Panel Count
When spacing solar lights for fence boundaries, equal intervals can create a neat pattern but do not guarantee useful visibility. Start with the gate, corners, path decisions, steps and work points. Then add intermediate markers only if they improve continuity.
Considere:
- fence length and post spacing;
- height and direction of each source;
- beam width and light on the ground or vertical surface;
- dark gaps at gates, steps and changes in direction;
- bright overlap where two fixtures face each other;
- viewer position from both properties; and
- solar input differences along the line.
For a path beside the boundary, check the route as a whole with the solar walkway lighting guide. Fence-mounted markers can support that path, but they should not create alternating bright and dark patches or direct glare into approaching eyes.
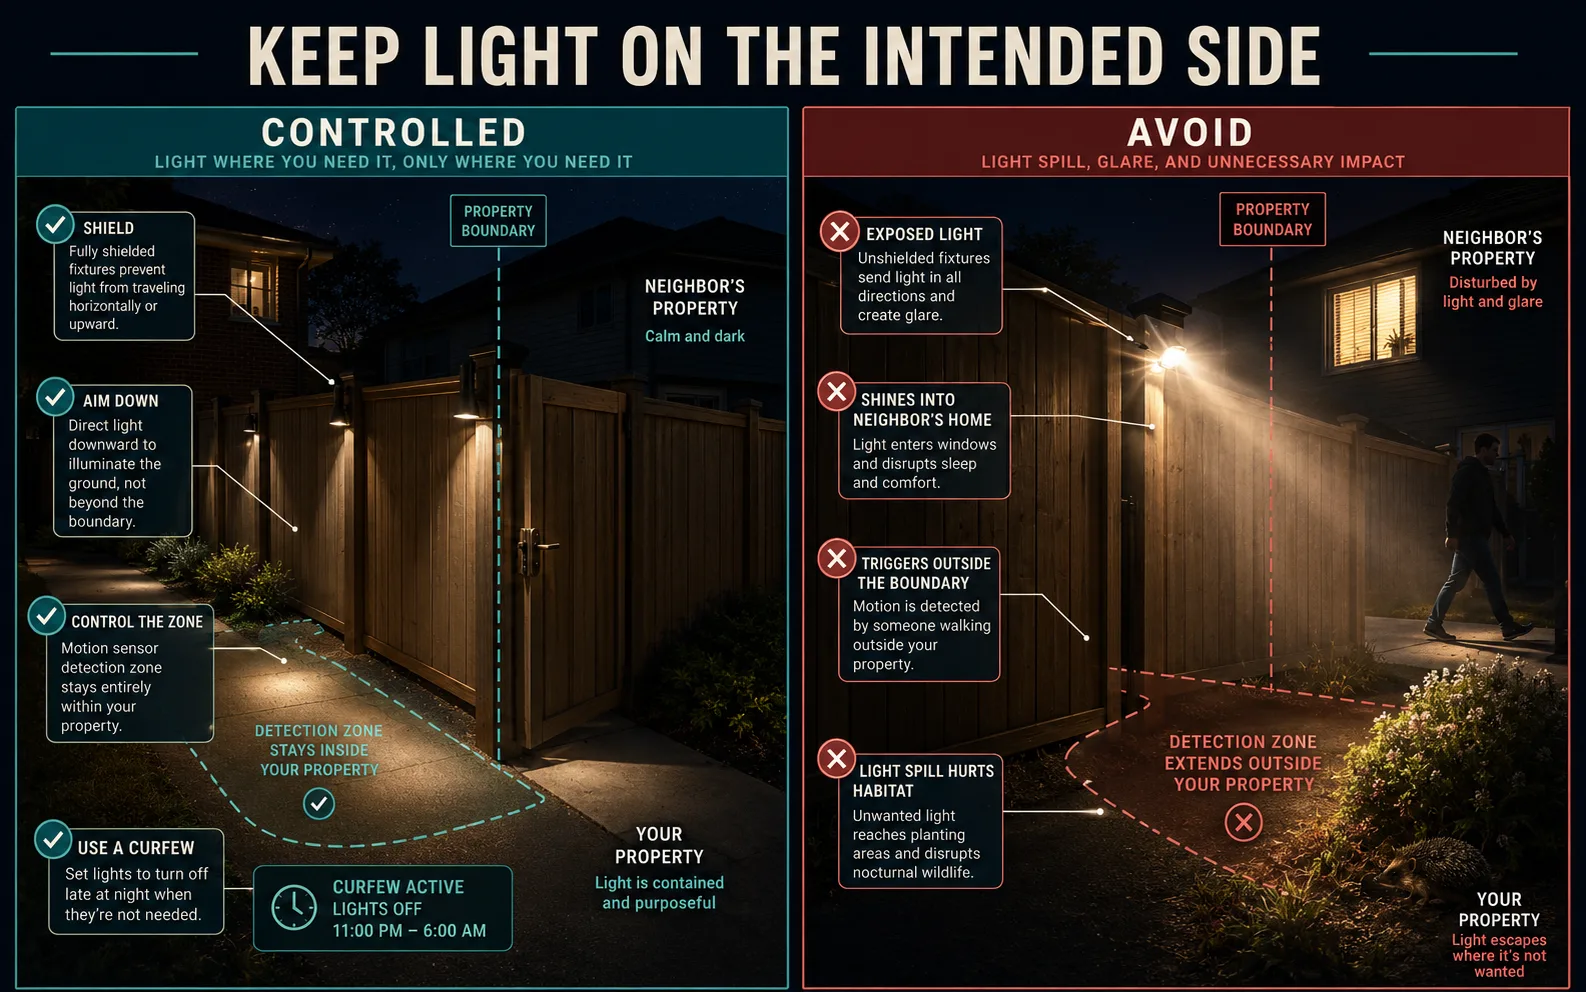
Keep Light on Your Side of the Boundary
Fence lighting sits close to neighbors by definition. A fixture aimed horizontally can send more light across the line than onto the owner’s path. A decorative up/down light can brighten an upper window. Motion sensors may trigger from movement outside the intended property.
Review the proposed view from both sides. Use shielding, downward aiming and the lowest useful output. Set detection zones, hold times and schedules to match the controlled area. Local nuisance-lighting, property, wildlife and planning rules may apply.
O Five Principles for Responsible Outdoor Lighting recommend light that is useful, targeted, no brighter than necessary, controlled and warm-colored where appropriate. For a fence, this means:
- every fixture has a boundary, gate, route or design purpose;
- the source and beam remain on the intended side where practical;
- output is not increased simply to overcome poor aiming;
- lights dim or switch off when the task ends; and
- color and timing respect nearby occupants and habitat.
Size the Energy System From the Operating Profile
Runtime depends on the actual time/output schedule, battery state, panel input, temperature and losses. “All night” may mean a low marker level, staged dimming or short motion events.
Comece com:
Nightly LED energy (Wh) = sum of operating power (W) × hours at each level
For illustration only:
1.5 W boundary level × 6 hours = 9 Wh
0.5 W late-night level × 6 hours = 3 Wh
Illustrative LED total = 12 Wh per night
The design must also include controller consumption and system losses using values for the proposed configuration. Ask for the PV and battery data, operating stages, solar-resource basis, temperature assumptions and reserve strategy.
Use a dusk-to-dawn schedule for continuous low-level marking only when the system is sized for it. Use scheduled dimming for decorative or venue boundaries. Use motion for an intermittent gate task only after defining the pre-trigger level, detection direction, boost, hold and return state. The dusk-to-dawn outdoor lighting guide explains the control choices.
Weather, Corrosion and Gate Movement
An IP rating describes a specified ingress test. It does not automatically prove UV durability, impact resistance, corrosion resistance, flooding tolerance or long-term sealing after battery changes.
Check the complete unit, connectors, seals, fasteners and mounting brackets for the actual exposure. Fence tops see direct sun, wind, rain, birds and debris. Low face lights may receive irrigation, soil splash and gardening impacts. Coastal or industrial environments may need additional corrosion review.
Keep lighting hardware out of gate hinges, latches, rollers and pinch zones. A light or panel attached to a moving leaf changes orientation and can be struck when the gate opens. Where possible, put the panel, battery and sensor on a fixed post and light the moving hardware from a stable position.
Plan replacement access. A long boundary can contain dozens of small units; replacing one style every season creates inconsistent appearance and maintenance waste. Record the model, location, control setting and compatible parts. The solar light parts guide explains why similar-looking batteries, panels and controllers are not automatically interchangeable.
Commission Solar Lights for Fence After Dark
Do not sign off solar lights for fence lines from a daytime installation photo. Record what the system actually does after sunset and retain enough detail to reproduce the check after maintenance.
Use a short commissioning sheet:
- assign every unit an ID such as
F01,F02eF03on the fence plan; - photograph panel shade at agreed checkpoints such as
09:00,12:00e15:00during the survey day; - record the date, weather, turn-on time and starting control mode;
- check the lighting state after
2,6e10operating hours when those times fit the agreed night profile; - take one view from the property side, one from the neighboring side and one along the fence line;
- open and close each gate through its normal travel and confirm that no light, panel, cable or bracket enters a hinge, roller or pinch zone;
- for motion control, approach from at least
3relevant directions and record the pre-trigger, trigger, hold and return behavior; - verify that latches, steps, signs and camera zones are visible without a bright source inside the normal sightline;
- note any unit with a different runtime, aim or charging condition instead of averaging the row; and
- save the final photos, settings and model information with the maintenance record.
This commissioning record gives future service teams a baseline for the solar lights for fence installation. It does not replace any inspection or acceptance procedure required by the project authority.
When Solar Fence Lights Are the Wrong Choice
Choose another method when:
- the fence and every practical remote-panel location are persistently shaded;
- the task requires verified emergency or safety lighting performance;
- the boundary needs broad, consistent security observation beyond small fixtures;
- the fence cannot safely carry the load or fixings;
- light cannot be kept out of neighboring windows, roads or sensitive habitat;
- gate movement creates impact, cable or orientation problems; or
- an existing electrical supply provides a simpler maintained system.
Solar lights for fence lines are strongest as local markers, accents and intermittent task lights. They are weaker when expected to replace a calculated perimeter, road or large-area lighting system.
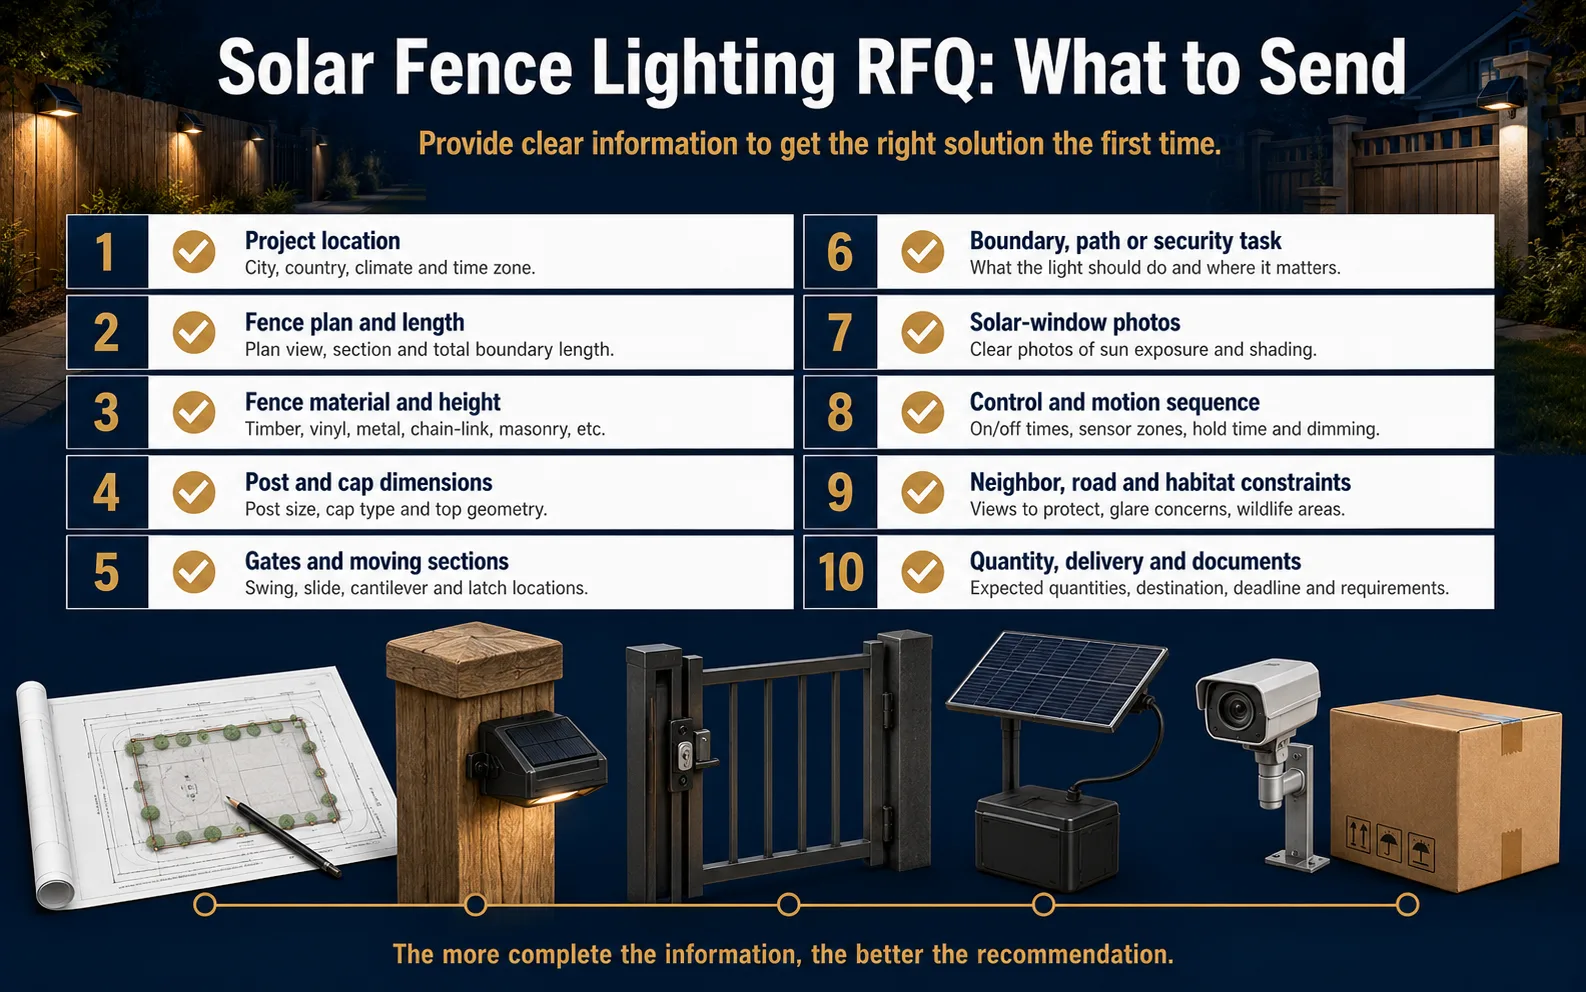
Fence-Light RFQ Checklist
For a commercial property, resort, park, estate, compound or multi-unit project, send:
- country, location and site environment;
- fence plan, length, height and gate positions;
- fence material, section and post dimensions;
- path, latch, sign, camera or boundary task;
- photos from both sides and main viewing directions;
- daytime solar-window photos and known seasonal shade;
- operating hours, dimming and motion sequence;
- neighboring windows, roads and ecological constraints;
- mounting, wind, impact, corrosion and maintenance constraints; and
- quantity, delivery location, drawings, test evidence, spares and warranty requirements.
A useful quotation should identify the actual mounting, optic, PV/battery arrangement, controls and assumptions. It should not present a decorative fence light as a complete security or compliance system.
Perguntas frequentes
What are the best solar lights for fence posts?
Choose a post-cap or side light that fits the finished post dimensions, drains correctly, receives useful sun and produces the intended marker or task light without glare. The best option depends on the post material, cap, environment and maintenance access.
Can solar fence lights stay on all night?
They can when the PV, battery and control profile support the output schedule under relevant conditions. Verify whether “all night” means full output, dimming or motion operation and ask for the assumptions behind the claim.
Are waterproof solar fence lights suitable for every outdoor location?
No. Check the exact enclosure rating and test scope. It does not automatically prove UV life, corrosion resistance, impact resistance or submersion suitability. Installation details and the complete assembled product also matter.
How far apart should solar fence lights be?
There is no universal distance. Place lights first at gates, corners, steps and route decisions, then check continuity, glare and overlap. Beam distribution, mounting height, fence material and viewing direction determine whether intermediate markers are needed.
Can solar fence lights be used for security?
They can support a gate or local observation point, but a security system may need broader coverage, vertical visibility, detection, camera coordination and a response plan. Use a perimeter-lighting review for that task.
Should a solar light be mounted on the moving gate?
Usually a fixed post is easier to aim, charge and protect. If equipment is attached to a moving gate, assess hinges, impact, cable or connector movement, changing panel orientation and safe clearances before installation.
Request a Project Review
Inlux Solar has 30+ engineers and has delivered more than 300,000 total units across 60+ countries. These company-wide facts are not claims about a dedicated retail fence-light model.
Inlux does not present a verified small retail solar-fence-light range on this page. For a commercial boundary, gate, park, resort or compound, send the fence plan, material, posts, tasks, solar window, controls and quantity. The engineering review can determine whether solar lights for fence positions, a wall light, solar flood light, pole-mounted system or wired solution is the honest fit.